B L O G
beautifying, loving, organizing & good things
for your home & life
for your home & life
|
|
|
|
|
|
|
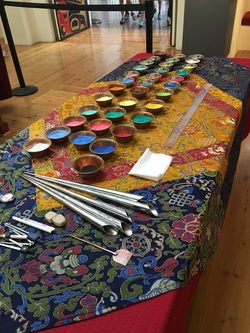
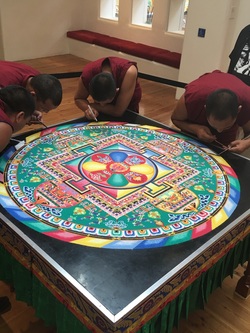
Last week the Tibetan monks were in Santa Fe at the Int’l Folk Art Museum on Museum Hill. I went to see them creating this intricate, gorgeous mandala out of colored sand. They worked as a team, creating an intricate, colorful masterpiece after just a few days. How does this apply to decorating your home? I learned three important lessons watching the monks. And all three lessons apply to decorating your home. LESSON #1: Patience with the process. The first lesson I learned was the extreme patience required to create something beautiful. Day after day the monks would bend over their emerging masterpiece with the patience of Job. A few grains of sand here, a few grains there. Carefully and methodically, patiently they worked. Step by step, the monks trust the process it takes to create. Beautiful things take patience. Ask any woodworker who makes fine furniture with his/her hands. Something beautiful takes time. Something as simple as repainting a door properly …. It takes a few hours to do it right. There is the necessary prep work. The primer coat. Then the layers of paint, carefully and patiently applied. Trust the process. Maybe you are remodeling or you’re getting frustrated that your project is taking forever. If you have a home improvement project that is taking a long time, King Solomon’s own house took 13 years! (See 1 Kings 7:1) If your place is taking awhile, then remember Solomon. And remember the monks. P-a-t-i-e-n-c-e.  Take only what you need Take only what you need LESSON #2: Take only what you need. When the monks filled their long funnels with the colored sand, I noticed they only took as much sand as they needed at that moment. Erma Bombeck said, “The odds of going to the store for a loaf of bread and coming out with ONLY a loaf of bread are three billion to one.” The same thing goes for our trips to the home improvement store. We go for one thing and come out with a cart full. Next time you go to the home improvement store, get only what you need. This is a good reminder - don’t buy a 5 gallon bucket of paint if you’re painting a tiny bathroom. Or if you’re staining a small table, maybe a just quart of stain will do the job. Heaven knows we DIYers tend to have too much leftover paint and stain in our garages. Let’s learn from the monks…. take only what we need.  Know when to DIY it and when to call in a pro! Know when to DIY it and when to call in a pro! LESSON #3: Some jobs are best left to the experts. Around the corner from where the monks were working, there was a very simplified sand mandala for the visitors to try their hand at making one. Cheerful volunteers coached us as to how to gently fill in the sections with colored sand. I had watched the monks many times and thought, "Pshh, I can do this!" But no matter how carefully I tried to achieve the same result, the little grains of sand would go outside the lines and tumble everywhere except where I intended. There was no denying – the Tibetan monks were clearly the masters of this art. Here too is another lesson – no matter how easy something may appear, there are some jobs best left to the experts! How does this apply to you? Know when your home improvement projects are best done by an expert. No matter how many times you’ve watched This Old House House, or watched hours of tutorials on YouTube – there is a time to call in the experts.  Decorating lessons learned from the Drepung Loseling Monastery monks: 1) Have patience with the process. 2) Take only what you need. 3) Know some jobs are best left to the experts.
0 Comments
If there is one thing you can do to completely transform any room, it is paint. It doesn’t cost very much, and it’s probably my #1 go-to tip when a client wants to refresh a space economically. We go off to the paint store and grab a paint card and say, "Yeah – that’s pretty good. I’ll take a gallon of that." We get home and start painting and (cue record scratch). "Oh my gosh…. What have I done?!?" Sound familiar? Dejectedly we trudge back to the paint store and reluctantly grab a gallon of boring, blah beige. We might as well stick with Arizona White. Sigh. I say, "Heck no… don’t settle for Arizona White!" Or abalone, alabaster, biscuit, china, cotton, dewdrop, early snow, fog, frosting, gauzy, hush, igloo, juniper, linen, marshmallow, mist, nuance, oyster, pearl, sand, snow, shell, wheat….etc. Yes, those are real names of blah, boring beige. Your rooms should lift your spirits, and make you happy to be there. God made so many gorgeous colors – don’t settle! A drab beige, taupe or greige, might suck the light right out of your room. But there is a trick to choosing paint colors. Here are 3 simple steps to choosing the right paint color. It’s really as easy as 1-2-3.  STEP 1 LOOK FOR CLUES: Look around the room and look for color clues. Be a detective! The right color is probably already in front of your nose. Maybe the perfect color is in a painting that you have on the wall. Maybe it’s in a throw pillow on the sofa or chair. Maybe it’s the background of that great family portrait. Wherever you find that perfect color – remember this – it’s your inspiration piece. The happiest color is already in your home – you just have to find it. Be a detective and find that inspiration piece. Look for clues in what you have already. STEP 2 CHOICES: Now that you’ve identified the color, go to the paint store and grab several paint cards that are close to the color you have in mind. Let’s say you’re looking for a soft green. Grab all the paint cards that are clear green. Then grab paint cards that are yellow-green. Go the other way and get some paint cards that are blue-green. Now you have a beautiful palette from which to choose your perfect color. Take the cards home and hold each one up to the inspiration piece you found in step #1. Some of the cards will look dirty or grungy compared to your inspiration piece. Then you know that’s not the right color. Try the next card…. If the paint card looks fabulous and looks like it came right out of your inspiration piece, then you have the right color! Most paint cards have 3 or so versions of the same color – don’t use the lightest – it’s a case of why bother. It is so pale it'll look like beige. The deepest color can be a bold choice so when in doubt go with the middle tone. STEP 3 TESTING, TESTING, 1-2-3. Go back to the paint store and get a little test pot of the chosen color. I suggest you paint a 3’x3’ sample onto the wall. Maybe paint it into the corner of two adjacent walls – light changes the color on different walls…. Look around your room right now, and you’ll see what I’m talking about. The exact same color can look like 4 different shades, all due to how much natural light there is, and what is in shadow. Do you see it? After you’ve painted your 3x3 sample on the wall, live with it for a few days. I know, this requires our least favorite word – patience. Why? I want you to live with the color and see how it looks in the clear light of the beautiful morning sun. How does the color change when it’s high noon? What does the color look like at night, with your room’s artificial lighting? Something that looks great in the daytime might turn muddy depending on your lighting. A little patience in this process ensures you will love the final paint color. Following this simple 3 step process will help you choose the right color for your space. You can do it! If you need a little help, then of course I’m happy to help you. I love color consultations – I have paint libraries of larger samples we can play with to help you get just the right color. But I think you can do it. And now you know how. Send me your before & after photos. I love to hear from you. ~Alana Light
I love hearing from you! Leave a comment here as to how you make your house a home. ~Loralana Light |
AuthorAlana Light Archives
April 2018
Categories
All
|